Fitting socks around ankles and heels
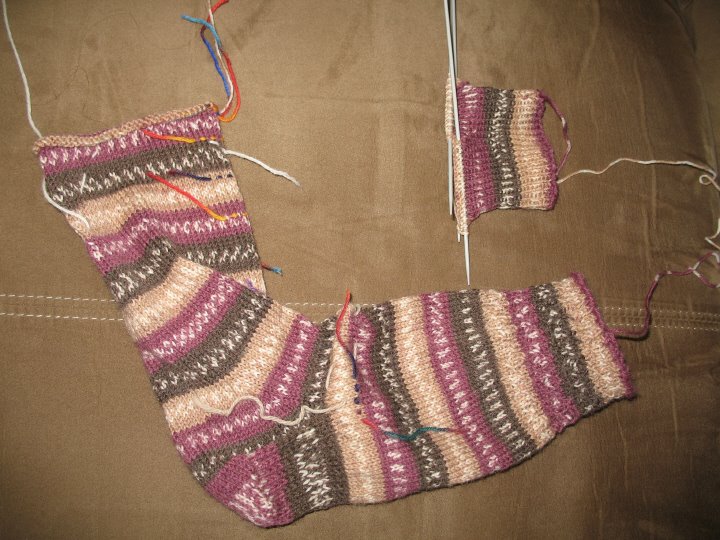
Here's the fitting sock I made for Aunt Connie, using the same stitch and row count as a Blauband pair that fits her perfectly (see comments on grist in earlier post). It is KnitPicks Simple Stripes in the Vineyard colourway and the grist of the yarn is very consistent, but the color period in the short dashed (dit-dot) white sections is uneven. In stockinette the white bits align here and there, and look a bit messy in other parts. As you can see in the fitting sock's cuff, the white bits look really horrid in baby cable ribbing, so I have cast on anew in k1p1 ribbing and it works. It isn't tidy, but has sort of a faux herringbone ripple effect. Oh, and that tan? It's more a flesh tone because it's picked up some of the pink dye from the burgundy stripes, but the dark brown balances it well enough.
If you squint you can see where I've taken a tuck in the front of the ankle. There are ten extra rows and I'll try to get rid of the bagginess by making the heel flap 6 rows longer, then do a rapid decrease at the top of the gusset to eliminate the other four rows of slack. I knitted the foot of the sock a few rows longer than her foot, then used some white yarn to baste around her toes. This is a really nice method for getting an accurate fit. There was too much ease in the back of the shank, too, so I'm tapering that gently, then I'll flare the top of the heel flap to regain the width for her ankle.
Helen commented about trying to fit her DH's feet: "... he has such SKINNY ankles, but a high instep, that it's hard to get to the ankle to both go over his instep and heel, and not bag when installed." It's all that golf, Helen! Are his calves well-developed, too? (I never looked at his legs when we went to the pool.)
Assume Dan has sculpted calves, skinny ankles, high arches, and perhaps a narrow heel? The easiest solution is a k2p2 ribbing shank, tapered by p2tog in stages down the back of the leg starting in the center and fanning out until the back of the shank is mostly k2p1. That can swallow a LOT of girth without sacrificing elasticity or disrupting the style. You can fancy it up with a few narrow cables distributed between the ribs (but that will tweak the elasticity so beware). If you need to flare the shank back out before the heel flap, do a more rapid fan of m1's in the purl ditches from out to in, pairing every other ditch if need be. This rarely bulges if done correctly.
I used to key the starting point of the heel flap off the height of the ankle bone, but have switched it to being related to where the top of the foot comes out of the ankle instead. It doesn't line up exactly, but is a percentage of that height (I'll fuss with the math someday and post the calculations). I have some patterns where the heel flap is over three inches long in order to get a comfortable fit! I prefer an EOP (eye of partridge, aka slip 1, k1, and purl the reverse) heel flap, especially for people with narrow heels that move more in their shoes and thus increase the wear.
EOP has, for me anyway, three requirements. 1) I use an odd number of stitches so I can have an extra RS knit stitch at the end, the one that is slipped on the WS. This places a column of worked-every-row stitches just inside the slipped edge, stabilizing it and making the flap symmetrical. 2) I slip the first RS stitch knitwise and all the other stitches purlwise. It gives me more consistent tension. YMMV. 3) Increases and decreases must be paired. I generally work them into adjacent stitches below. For wide heels especially, you can achieve an excellent fit by making a long heel flap and flaring it by working sets of increases every few rounds. Doing all the increases at the top of the flap makes a bulge and adds too much ease to the back of the ankle. Flaring in tiers adds the necessary width in a subtle way that actually FITS.
Take a look at the profile of the foot and think twice about how deep the heel needs to be relative to the front half of the foot. If Dan will let you, draw with washable pen where the gusset should be, then measure. Take a photo while you're at it (with a ruler next to his foot). A wide heel has fewer rows of decreases in the turn and makes a more shallow cup, so often needs a wider heel flap to start. Conversely, a narrow heel has a deep cup and needs a narrower flap. My dad has sturdy legs, huge ankles, and a triple-A heel, so I taper the heel flap, make the cup very deep, and work a few extra decreases in the last rows of turning the heel. His arches are high so his heel flap is very long. I continue ribbing down the front and top of his foot, and I do a rapid decrease in the gusset.
Gussets are splendid, forgiving, incredibly useful things. If you make a paper pattern (or muslin) of the heel flap and gussets, together they make a trapezoid that wraps around the back of the foot. The geometry of it is a lot of fun. There are, of course, many solutions to fitting a sock, but our goal is the one that is easiest to knit and the most durable. In a simple sock, the front of the ankle down the top of the foot to the beginning of the toe decreases is a rectangle, the sole between the heel cup and the toe decreases another rectangle, and the heel flap is a rectangle. The triangular gussets are the missing piece in the puzzle as these shapes wrap around your foot.
Gussets do not have to have straight edges. If a person's foot arches up off the floor close to the heel, you can work decreases in the sole edge of the gusset. If the person has a bulky ankle and bulky feet, the gusset might have only a few rounds of decreases and those could be well-spaced or even closer to the toe than the heel. I have the classic angle of decline for a gusset: decrease one stitch on each side every other round until no gusset stitches remain, and the sock will fit my foot. My husband used to lift weights and has muscles on his feet that add girth to his EEE bones. He gets a deep-deep heel cup so the gussets begin closer to the toe, then the decreases are every third round for a bit, then every other round. My dad? Decrease every round right away for many rounds, then switch to every other until the picked up stitches are gone *and* some of the sole stitches, too.
The yarn can make a difference. I like to use Sockotta for Chris Gustin's socks because k2p2 ribbing in this yarn is really elastic and clings well. I've had to tailor my brother's worsted-spun gray Fortissima socks more closely because that yarn in a k3p1 looks elegant but has very low elasticity as a fabric. The Patons Kroy orange toes have a much better snug factor because the yarn is more woolen than worsted in preparation. I wish Socka were still around!
posted by beadlizard at 11:22 AM
![]()
![]()


<< Home