Wednesday, November 30, 2005

Teen Knitting Club

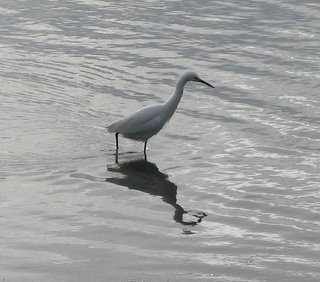
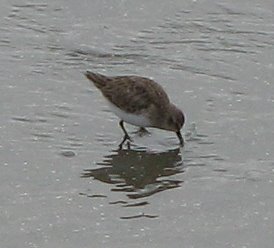
Wednesdays are Teen Knitting Club at the middle school (which DH and I both attended long ago). It's a solid hour's walk to school, so Wednesdays are also bird watching days. No photos of club, but I've put in a few birds.

TKC works best at schools because you have the potential for a captive audience and no transportation issues. If the kids want to attend, they will show up, which is not as consistently the case at libraries, church youth groups, and other after school venues.

If you're going to do a knitting club at a school, you'll need PTA and principal approval, a classroom assignment, a time slot, storage space, a designated parent and alternate parent, and a budget for supplies. At DD's middle school, the daughter of the head of the PTA got her mom to push it through. At the elementary school (where I guest knit sometimes on Thursdays, and yes I went to that school, too), the principal *is* the knitting teacher and thus it was an easy process. They have 35 or more 1st & 2nd graders every week!

The kids around here are pushed awfully hard to achieve, and most of them do. They are amazing kids, but they are stressed out! Nearly all the social time they have is spent in a competitive atmosphere or a see-and-be-seen party scene. The majority of these kids will go into law, finance, medicine, or politics. Everyone assumed that TKC would be the kind of thing where kids signed up, had specific projects and goals, and were expected to attend on a regular basis. In other words, just like the rest of their lives, but without a grade.


So, I decided to set up TKC as a salon, a la
Margene's process-oriented attitude. It's during their lunch hour once a week down in the classroom adjoining the gym (no academic stigma there!), a large, sunny room with work tables and decent chairs. The kids trickle in as they finish eating nearby in the lunch area, and only a few bring their own projects. I have a variety of needles (mostly large plastic straights) and balls of yarn, yarn catalogs, knitting books, and lots of WIP swatches piled on the tables. DD brings her Bosworth spindles and Grafton batts and teaches spinning. Some kids just wind balls and chat happily (they are mesmerized by the ball winder -- it's so Zen!).

Most plunk down in chairs and pick up the nearest swatch, figure out the stitch, ask questions or pick up something easier, and knit. It's mellow, we talk about everything, people come and go, and we have newbies every week and the better knitters teach the new ones. I'm just there as hostess and provider and question answerer. Today I taught one of the more advanced girls about how to do colourwork. We didn't actually do any, but I talked her through it and her cranial light bulb was in the halogen range. It will be fun to see what she does with the knowledge!

I've gradually been introducing new stitches, new yarns, and smaller needles. Some kids are knitting hats with dpns, but nobody *owns* any one project. It's a communal system instead of yet another focus on individual achievement. When a kid masters a technique, we pat him on the back and move on to the next. When a kid has a tough time, we talk about learning curves and compare notes on how long it took to learn this or that. No tears, just words of support, helping hands, lots of tandem knitting and courtesy rows, and choruses of rip-it to cheer us through the worst of it. I don't know whether they have even figured out that it's a pressure-free zone, but they sure are enjoying it. I'm planning to stitch together the swatches to make an afghan for charity.

Today was odd, though, because some popular upperclassmen stopped by to take photos for the yearbook. The elegant 8th grade photographer had brought her entourage of over a dozen tall, gorgeous guys and fashionable girls. They were polite but LOUD compared to the usual TKC kids, who tend to be nerdy or shy. I rolled with it and draped batts and skeins on the kids, got the nerds to mix with the fashionistas, and quite a few of the older kids ended up staying and knitting (one girl is FAST!). I'm going to snare some of the jocks eventually. They *want* to learn but have doubts. I am seriously considering getting some dads to come and be positive role models.


I have a PTA storage cabinet up in the school office. They gave me a modest budget for buying a few books and supplies. And there is a roster of parents willing to help, luckily some real gems.
So, Annie, does that answer your question? Btw, the way the comments section is set up right now, I can only answer here in the blog or privately if I already know the email addy -- the comments come to me as anonymous, unlinked emails. If you want a response off-blog, please say so in the comment and provide an addy. Thanks. I'll get up to speed on the technology soon but am rusty.
Tuesday, November 29, 2005

Laptop bag sheath

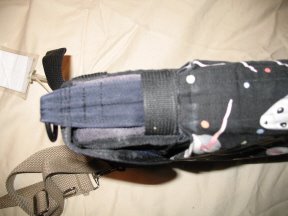
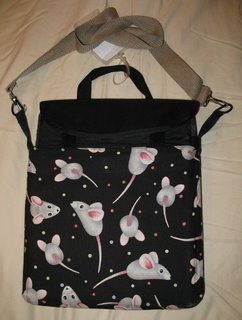
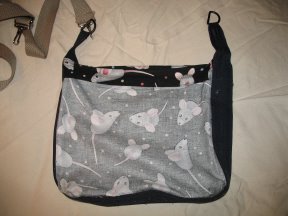
DD's school district supplies extra copies of every textbook so the kids can keep a set at home and not have to lug the things back and forth. Kids with multiple parental abodes get two sets! However, the school also supplies a laptop in a padded case and it must be lugged. The bus stop is a mile's walk down a steep hill, and the library is twice that. I sewed a sheath so she could wear the computer instead of having to use the dinky handle or cram it in her backpack.

This is the sheath, inside-out. I doubled cotton twill tape and sewed through it many times to reinforce the bag and distribute the weight better. There is also twill tape running around the top inside the facing. The school-issued padded case has a little strap on one side for a clip-on charger case. Running one of the twill tape arms up beneath the strap keeps the sheath from rotating or slumping. So far, the only wear appears to be the bottom corners, which I expected. I mitered and reinforced them and will simply sew another bag when the corners wear through. Now the little critter needs a raincoat! I've been wishing for deflector shields and a coat with rain gutters, and it's only the second spot of rain this season.

On the knitting front, I've finished Aunt Connie's left sock and am contemplating whipping out a right sock with the new shaped shank, longer heel flap, and rapid gusset, just in case I guessed correctly on the alterations. I cast on a mosaic swatch (BW1 Fretwork) simply because it's been about twenty years since I did any slip stitch knitting beyond EOP. I'm using up some Peruvian Collection Highland Wool and will turn the 82-stitch swatch into a small fulled purse for DD's wonderful history teacher. Since the PCHW pills so badly (still trying to get a good photo of DD's pilly Rogue), I'm converting it all to fulled items. There are a few other mosaic patterns to try, then I'll do some Bavarian twisted stich swatch purses to review that technique for the CIT and fill the gift basket.

First, though, I need to cast on a Wool-Ease hat to show the kids at Teen Knitting Club tomorrow.


Saturday, November 26, 2005

Fitting socks around ankles and heels


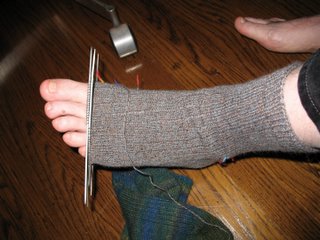
Here's the fitting sock I made for Aunt Connie, using the same stitch and row count as a Blauband pair that fits her perfectly (see comments on grist in earlier post). It is KnitPicks Simple Stripes in the Vineyard colourway and the grist of the yarn is very consistent, but the color period in the short dashed (dit-dot) white sections is uneven. In stockinette the white bits align here and there, and look a bit messy in other parts. As you can see in the fitting sock's cuff, the white bits look really horrid in baby cable ribbing, so I have cast on anew in k1p1 ribbing and it works. It isn't tidy, but has sort of a faux herringbone ripple effect. Oh, and that tan? It's more a flesh tone because it's picked up some of the pink dye from the burgundy stripes, but the dark brown balances it well enough.

If you squint you can see where I've taken a tuck in the front of the ankle. There are ten extra rows and I'll try to get rid of the bagginess by making the heel flap 6 rows longer, then do a rapid decrease at the top of the gusset to eliminate the other four rows of slack. I knitted the foot of the sock a few rows longer than her foot, then used some white yarn to baste around her toes. This is a really nice method for getting an accurate fit. There was too much ease in the back of the shank, too, so I'm tapering that gently, then I'll flare the top of the heel flap to regain the width for her ankle.

Helen commented about trying to fit her DH's feet: "... he has such SKINNY ankles, but a high instep, that it's hard to get to the ankle to both go over his instep and heel, and not bag when installed." It's all that golf, Helen! Are his calves well-developed, too? (I never looked at his legs when we went to the pool.)

Assume Dan has sculpted calves, skinny ankles, high arches, and perhaps a narrow heel? The easiest solution is a k2p2 ribbing shank, tapered by p2tog in stages down the back of the leg starting in the center and fanning out until the back of the shank is mostly k2p1. That can swallow a LOT of girth without sacrificing elasticity or disrupting the style. You can fancy it up with a few narrow cables distributed between the ribs (but that will tweak the elasticity so beware). If you need to flare the shank back out before the heel flap, do a more rapid fan of m1's in the purl ditches from out to in, pairing every other ditch if need be. This rarely bulges if done correctly.

I used to key the starting point of the heel flap off the height of the ankle bone, but have switched it to being related to where the top of the foot comes out of the ankle instead. It doesn't line up exactly, but is a percentage of that height (I'll fuss with the math someday and post the calculations). I have some patterns where the heel flap is over three inches long in order to get a comfortable fit! I prefer an EOP (eye of partridge, aka slip 1, k1, and purl the reverse) heel flap, especially for people with narrow heels that move more in their shoes and thus increase the wear.

EOP has, for me anyway, three requirements. 1) I use an odd number of stitches so I can have an extra RS knit stitch at the end, the one that is slipped on the WS. This places a column of worked-every-row stitches just inside the slipped edge, stabilizing it and making the flap symmetrical. 2) I slip the first RS stitch knitwise and all the other stitches purlwise. It gives me more consistent tension. YMMV. 3) Increases and decreases must be paired. I generally work them into adjacent stitches below. For wide heels especially, you can achieve an excellent fit by making a long heel flap and flaring it by working sets of increases every few rounds. Doing all the increases at the top of the flap makes a bulge and adds too much ease to the back of the ankle. Flaring in tiers adds the necessary width in a subtle way that actually FITS.

Take a look at the profile of the foot and think twice about how deep the heel needs to be relative to the front half of the foot. If Dan will let you, draw with washable pen where the gusset should be, then measure. Take a photo while you're at it (with a ruler next to his foot). A wide heel has fewer rows of decreases in the turn and makes a more shallow cup, so often needs a wider heel flap to start. Conversely, a narrow heel has a deep cup and needs a narrower flap. My dad has sturdy legs, huge ankles, and a triple-A heel, so I taper the heel flap, make the cup very deep, and work a few extra decreases in the last rows of turning the heel. His arches are high so his heel flap is very long. I continue ribbing down the front and top of his foot, and I do a rapid decrease in the gusset.

Gussets are splendid, forgiving, incredibly useful things. If you make a paper pattern (or muslin) of the heel flap and gussets, together they make a trapezoid that wraps around the back of the foot. The geometry of it is a lot of fun. There are, of course, many solutions to fitting a sock, but our goal is the one that is easiest to knit and the most durable. In a simple sock, the front of the ankle down the top of the foot to the beginning of the toe decreases is a rectangle, the sole between the heel cup and the toe decreases another rectangle, and the heel flap is a rectangle. The triangular gussets are the missing piece in the puzzle as these shapes wrap around your foot.

Gussets do not have to have straight edges. If a person's foot arches up off the floor close to the heel, you can work decreases in the sole edge of the gusset. If the person has a bulky ankle and bulky feet, the gusset might have only a few rounds of decreases and those could be well-spaced or even closer to the toe than the heel. I have the classic angle of decline for a gusset: decrease one stitch on each side every other round until no gusset stitches remain, and the sock will fit my foot. My husband used to lift weights and has muscles on his feet that add girth to his EEE bones. He gets a deep-deep heel cup so the gussets begin closer to the toe, then the decreases are every third round for a bit, then every other round. My dad? Decrease every round right away for many rounds, then switch to every other until the picked up stitches are gone *and* some of the sole stitches, too.

The yarn can make a difference. I like to use Sockotta for Chris Gustin's socks because k2p2 ribbing in this yarn is really elastic and clings well. I've had to tailor my brother's worsted-spun gray Fortissima socks more closely because that yarn in a k3p1 looks elegant but has very low elasticity as a fabric. The Patons Kroy orange toes have a much better snug factor because the yarn is more woolen than worsted in preparation. I wish Socka were still around!

Yarn Equivalence


Sara asked about spinning standardized yarn for socks. For many years I did serious technical spinning and made oodles of standardized yarn. Alden's class on Spinning to a Standard is essential, and his techniques make replicating a particular yarn or repeating your own, consistent spinning very, very easy.

Stephenie can recite the various margins for error in grist that amount to a significant change in gauge or sett. Coarse singles definitely show the difference far more than froghair! My goal is usually to keep within 5% to either side of the intended grist. It takes a level of concentration and intention to achieve that, but it is definitely possible. Ideally, the fiber itself is unvaried, something like a Janet Heppler fleece (lovely, consistent stuff!), prepared the same throughout. To repeat a particular level of lumens, I spin for the same hours each day, using one bobbin, winding off onto storage bobbins. When the entire batch of singles is complete, I ply, and I try to do it all in one afternoon. If at the end of the process I've got a few skeins that are outlyers, they become cuffs or facings.

I don't expect the various sock yarn manufacturers to standardize their product, but I do find myself pondering making a table of equivalents to ease substitution. I used to have a bright green yarn guide booklet -- has anyone updated it? One of the things I enjoy nowadays is how diverse the selection is at a good LYS, but it really is a bother for socks. My goal is a perfect fit, plus I appreciate the efficiency of being able to pull a pattern card out of my box and grab a yarn that is an appealing color and whip out a pair of socks. I've begun storing sock yarns in bins sorted by grist, and I'm paying much closer attention to ball bands now when I buy yarn.

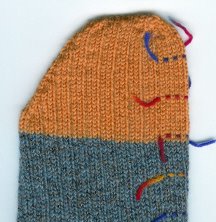
For Annie, a quick scan of an orange toe (complete with markers in case I have to rip and re-knit after the final fitting). The Patons Kroy orange is coarse compared to the grist of the Fortissima gray, but for a toe it's not much of an issue.

Friday, November 25, 2005

Current socks


Yesterday at the family supper I had my brother and aunt try on the socks I'm knitting for them. I have a perfectly good pattern for my brother, but written for a discontinued Socka yarn (the green sock on the floor) that has more rows per inch than the Fortissima gray in the above photo. Same stitch gauge, but a totally different fabric. The grey is almost worsted in preparation, a mouse gray plied with a strand each of orange and black. I have, of course, run out of yarn at the point in the photo and last night knit the toes in bright orange. He had wanted something subtle to wear to work with a surprise when he takes off his shoes at home.

My brother's feet are easy to fit since they are simple a larger and much longer version of my foot. I was all set with short contrasting yarn worked along the sides every ten rounds, just in case, but all I had to do was start his usual toe pattern 8 rounds early. Done now and ready for him to try on at Christmas. Might whip up another pair for him between now and then...

My aunt's feet are pesky! Ten rows of baggy front ankle just above the heel flap, over a half size difference in length and very different angles to the toes, and the back of the shank really needs a bit of a taper, too. I'll rip back to above the heel flap, add 6 rows/3 slipped stitches to the flap, and taper the shank while I'm there, then try a rapid decrease at the top of the gusset. Again, I have a pattern that fits her in Blauband but she liked a colourway of KnitPicks. It always surprises me how different the various sock yarns are.

I'm almost to the heel flap on a pair of Mellenweit Multiringels for my dad. His base pattern is for Regia Banner, and it looks as if the yarns are close enough in character and grist to be interchangeable. The Lana Grossa MM yarn is really lovely stuff, dense and even, excellent color saturation, about a 2400 stitch color repeat, but the hand is a tiny bit harsh. We'll have to see how it softens when washed.

The old ball of yellow striped Opal I picked up for myself in a sale bin at the Black Sheep Gathering in June is of a finer grist than my Regia base pattern, so I cast on 80 instead of my usual 72 and am knitting the entire shank in k2p2 ribbing since it's forgiving. I'm thinking snug when I knit instead of going down to size 0 needles, and it seems to be working.

Supper yesterday was lovely. My grandmother wore a pair of socks I knit for her and my brother wore a pair of socks she knit for him. The weather held, crisp and autumnal, and then the rain and wind hit today.

Thursday, November 24, 2005

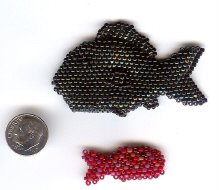
Fishies with a dime for Sara


Still digging in the box for the striped fish, but did find an old green and black and a mini red jumble, and a dime. And I promise to have my first digital camera lesson today. I'm hoping it will see what I don't.

Wednesday, November 23, 2005

Pish

Getting there from here...

A basic challenge in the kind of beadwork I do is figuring out where to start. The foundation rows or rounds always have a different thread tension from ensuing work, usually firmer. I try to plan the fabrication order so that solid bit is an asset. Another consideration is holding the piece while you work on it. Holding a snout is tricky, plus the facial expression makes or breaks an animal, so it's best done last. Decreases are inherently smoother in peyote stitch than increases, thus starting at the widest girth is always good, if it's feasible.

Even with my current wonky vision, I can work very quickly because I have figured out the most efficient relative positions of the various elements: lighting, piles of beads, the active edge of the beadwork itself, hands, needle, and thread tail. If the beads are in the wrong place, the light won't illuminate them clearly, the thread will drag through and send them tumbling to the floor, you'll be reaching instead of doing a quick scoop action with your needle, etc. My typical short day in my 30's was 500 beads, a long day was 1200, and if it was just a flat-woven piece I had a daily goal of 2500-3000 beads. The really fast speeds do assume you know what you're doing and are rarely achieved in the design phase, but are easy to meet if working from a template style pattern. Speed can also be increased by writing patterns so they have natural stopping points, row counts and other ways of figuring out where you were when the phone rang..., and are easy to see.

My standard fish pattern is an example of the widest girth method -- waist to tail, waist to mouth, then fins. It's a bit like making a thimble at first. I made this one (see next post for image) after radiation but before the burn damage peaked. Using diagonal bars of black opaque and silver-lined translucent blue AB made it much easier for me to see where to put the next bead. Those are either 4 mm or 6 mm black onyx eyes. I need to dig the guys out of their box and measure.

If you've seen these fish in person, they're a lot of fun. You can push and pull on the side fins to make them puff. Someday I'll write about how I got into the business of silly beadwork.

Tuesday, November 22, 2005

Mazama

Maiden Voyage

This is my first blog swatch, certain to need frogging, so please be patient as the Orb and I negotiate a truce with Blogger. I will soon be posting photos and commentary, things friends have asking for the last few years. And yes, I *am* going to publish a beadwork pattern book. Dealing with the Orb delayed things, but I still have my pattern files and a box of body parts and good intentions. And no, I don't take orders and I don't sell single patterns anymore, but I do teach now and then.

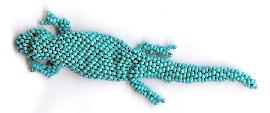
My emissary, Mazama, is in a reduced state in my profile. He's from, oh, early 1988? The second incarnation of my basic lizard pattern, worked in opaque turquoise blue Czech 11's, Nymo B thread, a bit of beeswax and a size 12 beading needle. I think his eyes are translucent dark amethyst Czech 11's. I made him while sitting in the woods of the Mazama campground on the way up to Crater Lake in Oregon, on a jaunt with Tim.

Czech seed beads are wonderful for sculptural peyote beadwork because they are of highly variant width but relatively uniform diameter. As I work, I grade the beads into two piles, narrow and wide, next to the starter batch on the piece of suede covering my desk, and I fling any chipped or bubble glass on the floor to vacuum later.

Really distinctive beads like wedges or long tubes are scooted to the edge until needed. I enjoy adding a wicked curve to a toe or crest by working a short fringe of a tube, a wedge, a few tubes, and a round end bead.

The most slim of the narrow beads are reserved for the more visible increases, like the back of the head or the base of the tail. Other slims are used as needed, the remainder softening the angles of the nose. As you can see, I hadn't quite mastered noses circa Mazama's creation.

Beads with a bit of length to them, especially those with a more square profile, are excellent in areas where bias is a problem, like preventing a twist in a linear skin pattern on a torso. I also use them to augment and thus curve a sector of a tail or belly. I prefer to use beads with the classic oval Czech profile when working an irregular skin pattern like that of a gila because the fabric has a strong bias that makes the color pattern much more interesting looking.